CONTROL & AUTOMATION SOLUTIONS
Depending on which metaphor one chooses to apply one can say that the control system represents the foundation of the smart home or an “integration layer” on top of the individual devices. In any case, the fact is that each component, be it a light source, camera, actuator, etc., only provide so much benefits on its own. But if we connect the components together, many more opportunities open up, offering much more benefit. You might call this “smart home level 2” and it does require some more effort to set up, but it significantly increases the return on your investment. This category deals with ways to create this integration across components.
- Ecosystems built around smart voice assistants (and largely around smart speakers as physical base units) based on proprietary communication protocols
- Ecosystems based on more generic communication protocols (and connected through some type of physical base unit)
- Ecosystems based on internet communication (and without any physical base unit)
- Ecosystems based on internet communication (but requiring a dedicated server to run the platform)
- Apps by different manufacturers/3rd party apps that offer more advanced possibilities
- Reflections and advice about (wireless) networks
Like all the other categories, also here you have several alternatives to choose among, each entailing some different opportunities and challenges and also carry different price tags. As always, I have no ambition to present an all-encompassing overview of all the possible solutions out there, but rather to bring forward some often used alternatives, broken down based on which primary technology these utilize (although the demarkation lines are not as distinct as the list below indicates):
Ecosystems built around smart voice assistants
This category is dominated by three key competitors:
Amazon Alexa, which is the voice assistant itself, is available in different versions of the Amazon Echo base units (and different smart phones and lately also different other types of products, e.g., a microwave oven)
Google Assistant, which is the voice assistant itself, and also here there are different versions of the base unit Google Home (and you can use different smart phones)
Apple Home, (formerly called HomeKit) which is the term for the integration platform, which uses the voice assistant Siri, and where you can use a HomePod, Apple TV, and iPad as base unit and additionally control it from an iPhone (and from 2018 also a Mac)
These voice assistants were not necessarily developed with control of smart homes are their primary purpose; they can answer all kinds of questions, give travel directions, play music or video, etc., but one of their abilities is to send commands to smart devices. This latter function is the one of interest to this site, and in this area, the three voice assistants are both similar and dissimilar. Let’s look at some important aspects of each of them:
Amazon Alexa/Amazon Echo build on a so-called Smart Home Skill API, which is an interface various product suppliers can use to create skills for their products. These allow users to utter predefined voice commands to control a wide range of devices. For more advanced automations, there are so-called routines, which let you assemble a series of commands for multiple devices. The programming itself is done in the Alexa app on your phone. Compared with both Apple Home and systems based on open protocols, Amazon Alexa is still somewhat limited when it comes to more complex programming, although this is evolving. For example, in August 2018, APIs for contact and motion sensors were released.
Google Assistant/Google Home is quite similar to Amazon Alexa in that also here, you apply routines to control single devices and integration across these. This is set up in the Google Home app on smart phones, but the opportunities for more advanced programming of interactions among devices is (at least per now) even more limited than for Amazon Alexa.
Apple Home/Siri is in some ways a similar solution as those from Amazon and Google, in that voice control and a smart speaker are important components. But Apple Home is different in that it offers more powerful opportunities for advanced programming and interaction across devices (there are apps from both device manufacturers and independent software suppliers that are even more powerful, more about some of these toward the end of this page).
If you decide to go down this main road, the choice among these three will typically depend on which ecosystem you already chose through your choice of smart phone (although the edges are blurring) and, if you already acquired some smart home devices, which platform these support. Regarding the latter, there are differences among the ecosystems concerning how many devices are supported, where Apple Home poses stricter requirements, previously even demanding specific hardware components to be approved. To many, security and privacy are key criteria when choosing a platform. While there are probably counterarguments that can be brought to the table, it is fairly generally accepted that Apple Home scores better in these areas than Amazon and Google. In other areas, one of the latter is declared the winner, e.g., Google is considered best at both understanding what you say to it and giving sensible answers to questions posed. It is also a trend that many smart devices developed are compatible with two or all three of these ecosystems.
Personally, I don’t try to conceal the fact that I am very securely anchored to the Apple Home platform, with my installed solutions utilizing many of the opportunities offered. But I will also admit that there are things I simply cannot get done in Apple Home that one of the others would allow and we do also have an Amazon Echo. You will find more detailed descriptions of my solutions under the different rooms in the menu on the right.
Ecosystems based on more generic communication protocols
Under this heading, there are also several alternatives to choose among, but the by far most common wireless smart home communication protocols are:
Z-Wave, which uses low-power radio waves (at a frequency of 868.42 MHz in Europe, at 908.42 MHz in the North America and other frequencies in other countries depending on their regulations) that easily penetrates wall, floors, and furniture. All kinds of home electronics can thus be connected together as an integrated wireless network. Units that have been activated for Z-Wave from the manufacturer (much the same way as with built-in support for Amazon Alexa or Apple Home) can easily be added to an existing Z-Wave network while many non-Z-Wave devices can be made compatible by connecting them to a Z-Wave module. The heading of this section is “generic” communication protocols, but this does not imply that Z-Wave is an open protocol. It is owned by Sigma Designs and administrated by a Z-Wave Alliance, but the large number of manufacturers (700+) and products using Z-Wave (2,400+), it must definitely be considered a “generic” protocol.
Zigbee is a “true” open communication protocol operating at the 2.4 GHz frequency, but also this one is controlled by a dedicated body, the Zigbee Alliance. As for Z-Wave the main purpose is the connect devices together in a wireless network and allow the user to control it. There are said to be more devices on the market supporting Zigbee than Z-Wave (2,500+), but from fewer manufacturers (400+).
- Lately, Z-Wave and Zigbee have been challenged by a new protocol, Thread, which has some benefits compared with these two. It uses less energy and it establishes a separate mesh network that is not vulnerable for nodes falling out since it “self-heals”. More and more products support this protocol, including that the HomePod Mini and the most recent Apple TV 4k from Apple support it.
Let us also look at some common ecosystems/base stations (there are others) from different manufacturers (supporting Z-Wave, ZigBee, or some other protocol):
Athom Homey, which I added to this page as late as December 2018 as it was then announced that their new beta version of the app offers HomeKit support. What one can read from the product page, it supports almost very communication protocol of relevance and is said to support more than 50,000 devices. Like Homebridge, it relies on a community of developers to bring out Homey apps.
Samsung SmartThings, supports both Z-Wave and Zigbee as well as Amazon Alexa and Google Home. You can also use Samsung’s own SmartThings app, both to monitor/control single devices and program more complicated routines. It should be noted that the devices compatible with SmartThings, and thus what can be achieved in terms of automation/programming, is quite different from Europe to the US. The most complete overview of supported devices is presented on the US site. The base station, which by December 2018 is in version 3, is fairly reasonable and can be picked up for less than 100 €.
Fibaro Home Center 2, is a system based on Z-Wave and also compatible with Amazon Alexa and Google Home. Also this system offers rich opportunities for integration and programming (on a smart phone/tablet/computer). Fibaro itself produces many compatible devices and Z-Wave components from other manufacturers can of course also be used. The Home Center base station is far more expensive than the SmartThings hub, typically about 600 €, but there is a Light version at around 300 €.
Wink, another platform based on a base unit and where the 2nd generation supports a number of protocols (Zigbee, ZWave, Bluetooth, WiFi, etc.). Tre company offers some komponents on its own but also supports a broad spectrum of products from other manufacturers. The price for a hub is about 100 USD, but it is unclear whether this can be used in Europe (for Z-Wave, at least, the American frequency is used).
HomeSeer is yet another supplier, which offers several versions of the base unit, with prices for the cheapest model around 150 €. Like SmartThings, HomeSeer is compatible with both Z-Wave, Zigbee, Amazon Alexa and Google Home, and many other protocols. Also for this platform, the supplier makes a number of components on its own (though also in this case more for the US market), while components from other manufacturers can be integrated. Without having any personal experiences with HomeSeer, the user threshold seems somewhat higher than the more consumer-oriented systems mentioned above.
Panasonic Smart Home is really more an alarm/security system than a generic smart home system. This is also reflected in the selection of components available and that the communication protocol used is DECT/WiFi, which means you are more or less dependent on using native Panasonic devices.
A logical question to ask when considering these systems and their base stations is whether you can do with just the base station you opt for or you will also have to get, e.g., a Philips Hue bridge for Hue light sources? The answer is not crystal clear; on the one hand, there are many recipes online how to connect both light sources and other devices from different producers without having installed the corresponding native base station. On the other hand, going down this route, you will most likely lose some functionality you would otherwise get from having the native base station, especially firmware updating typically requires having the manufacturers hub.
Ecosystems based on internet communication (and without the need for a physical base station)
Contrary to the solutions presented in the previous section, which are all based on using a hardware base unit for connection/integration, the ones presented below are ecosystems that form an integration layer “above” the smart components. These components must already be online through some means, be it through built in WiFi, a corresponding base station, or one of the generic platforms mentioned in the previous section. The big advantage of the internet-based ecosystems is that components that don’t inherently “speak the same language” still can be connected together to create more advanced solutions. You will hardly be surprised to hear that also this category offers several alternatives... I will only mentioned a couple of the most frequently used platforms, knowing all well that the one ideal to your needs might be left out:
IFTTT, which is an abbreviation for If This Then That, is a free, web-based service that lets users make chains of commands built on this “if-then” logic. Since this is an open platform, users/product manufacturers contribute so-called “applets”. For a device to be able to connect to IFTTT, you are dependent on the supplier of the device to enter into a partnership with IFTTT and open their product/service up for access to signals/actions. My own experience is that you can be more or less lucky in terms of whether your device and what you want to achieve is supported. Programming is done via a browser or the IFTTT app for a smart phone/tablet/etc. If you have started making your home smarter, but have not yet investigated the opportunities offered by IFTTT, this could be the next step to achieve more advanced functionality.
Stringify is in some ways similar to IFTTT in that this is also a free and open platform that lets users program integrations among different devices and services. A primary difference is that where IFTTT builds on the simple “if-then” logic, and thus only allows less complex automations (note that also IFTTT has added ways to achieve more complex programming), as the name implies, the purpose of Stringify is to create chains of actions. This is done by creating so-called “flows” that can link several triggering factors with several actions, also based on filters/criteria that must be met. By now, programming is done in a separate app for smart phone/tablet, but there is also a beta version of a web portal. Sadly, in April 2019, it was announced that Stringify is being closed down.
The advantage of these platforms is that you don’t have to choose one or the other. They can be used simultaneously as supplements to other types of programming and if you are lucky, one of them can solve a problem the other cannot.
Ecosystems based on internet communication (and requiring a dedicated server)
The following platforms are similar to IFTTT and Stringify in that they are open and based on users contributing solutions. Furthermore, they don’t require a native base station from a specific manufacturer, but they distinguish themselves from the the likes of IFTTT in that they do require a server to run the software. This undoubtedly raises the bar for choosing this approach, but at the same time, they offer opportunities for integrating devices that cannot be achieved through other approaches. They will also force you to enter a little more deeply into the world of programming, which itself is a useful experience. I will mention three alternative platforms here, which are both similar and dissimilar in some ways:
openHAB, which has its roots back to 2010, is built on Java. Depending on which components you already have (and which protocols these use) you might need a (fairly inexpensive) USB dongle to communicate with the devices. Programming is done through a web portal or an app for smart phone/tablet.
Home Assistant is based on Python and seems to be more frequently updated than openHAB. Also for Home Assistant you might need a USB dongle, but it said to be easier to detect compatible devices than what is the case for openHAB. Programming is done exclusively through a web portal, but there are alternative user interfaces for different types of devices.
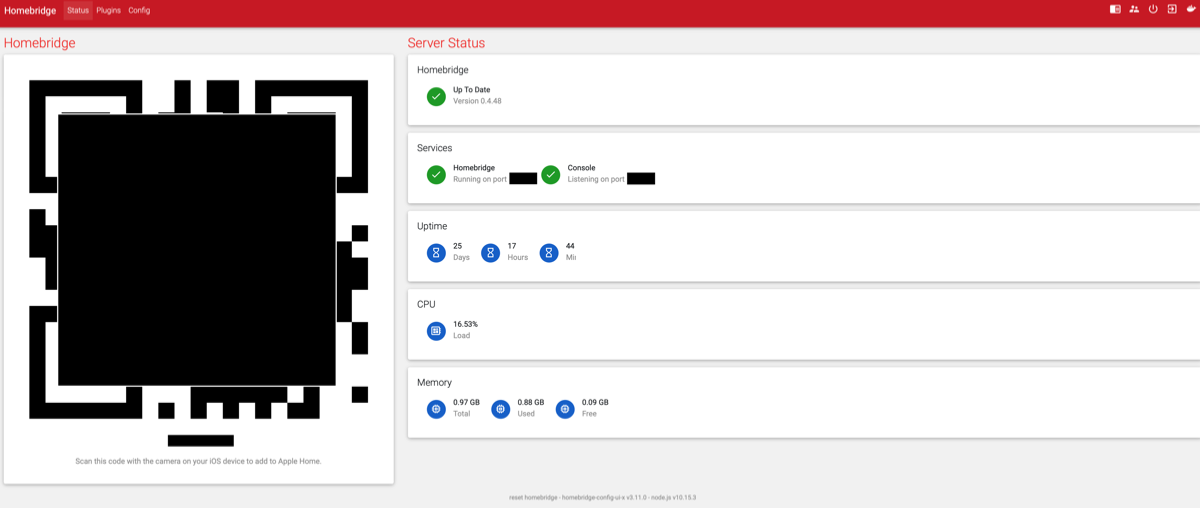
Homebridge is also an open platform, based on NodeJS. Contrary to openHAB and Home Assistant, which are generic platforms, Homebridge was created especially to allow Apple Home integration of components without native support for this. Homebridge thus allows controlling such components use the Home app and/or he voice assistant Siri (notice that both openHAB and Home Assistant also have program components that allow using the Home app/Siri to control connected devices). Different manufacturers/components are added to Homebridge using so-called plugins, which are developed as open source code by a community of enthusiasts. Unlike the other two mentioned, Homebridge does not require any USB dongle and programming is done just like for natively supported Apple Home devices in the Home app on an iPhone/iPad/Mac.
All these three require installing the server software on you own suitable server drive. There are many options how to solve this; you can use a Windows PC or a Mac (preferably computers that are always running), you can go for a so-called NAS (Network Attached Storage), e.g., Synology or QNAP, or you can use a dedicated computer, where a commonly used alternative is a Raspberry PI. For the latter, there is also a more complete solution, called HOOBS, where one can either buy a complete package, including the Raspberry PI, or the software on a MicroSD card/for download if one already has the Raspberry Pi. I will not spend any space there explaining how you set up the Homebridge server; there are many excellent step-by-step instructions to be found elsewhere for the different platforms.
In our case, the smart home is primarily based on the Apple Home ecosystem. But partly since we already had non-Apple Home compatible devices installed before I even started on the smart home journey and partly since there are some automation areas that, at least per now, are unsolvable using only Apple Home compatible components, I have set up a Homebridge server. I already has a Synology NAS suitable for this, see pictures under office, and followed this recipe to set it up. Unless other ways of setting up the Homebridge server (where you must do more command-line work), this option gives you a web-based interface to install and configure plugins, see screenshots below. More details about specific solutions I have installed based on Homebridge are found under the various rooms in the menu on the right.
Apps by different manufacturers and 3rd party apps that offer more advanced possibilities
In the last section on this page, I find it useful to mention that for some manufacturers of devices, it can be useful to look into functionality offered by the native apps developed by these companies. In some case, you must install the app of the manufacturer simply to identify the component and/or to update the firmware of the component, but even where this is not the case, the native app can give you possibilities you would otherwise miss out on. Furthermore, there are third-party apps, for different ecosystems, that go beyond what native apps do, but in terms of user interfaces or functionality.
So I will list some of the most used apps I have installed, first as a result of having acquired devices from some relevant manufacturers:
Elgato Eve app, which offers some functionality that goes beyond the Home app. One useful feature is a display pane where all the Apple Home-connected devices (including those connected via Homebridge) are grouped by type of component and data available, e.g., temperature sensors, energy consumption, contact sensors, indoor climate, etc. This has in fact in some cases been how I have discovered that some components/sensors actually register other variables than I was aware of. The most important added functionality Eve offers is though the opportunity to create more complicated automation rules than what the Home app does. More specifically, you can make rules based on three factors; one or more triggering events/values (called triggers), one or more states/conditions that must be met (called conditions), and a scene (which can be a single action or a combination of actions) to be run. Triggers, conditions, and scenes can be defined very specifically, and when a rule has been programmed in the Eve app, it appears in the Home app as well (and can even be edited there). Rules then run in the background and monitor the involved devices to check whether the defined events have been triggered, check whether the conditions are met, and if so run the defined scene. As an example, in my case, I have created a rule for the upstairs bathroom lighting; if the bathroom motion sensor is triggered (rule trigger) and the lamp on the wall outside the bathroom is off, which means that we have gone to bed (condition), the bathroom light is turned on to 3% red light (scene) as a minimal night light. However, if the lamp outside the bathroom is on, i.e., we have not turned in for the night, the light is turned on at full brightness. At least with the current Home app functionality, this could not be set up in that app.
Philips Hue app, which gives you some more programming options for Hue lights that cannot be achieved in the Home app. Some examples are gradual increase of brightness as an alarm “clock” or gradual decrease of the brightness as preparation for going to bed. It is also possible to choose predefined “moods” for different light sources; these are not visible in the Home app.
IKEA app, which actually is required to connect Trådfri devices together. Contrary to motion sensors or switches from, e.g., Philips Hue or Elgato Eve, these components from Trådfri do not appear in the Home app. They can therefore not be set up for automation of other devices; the only way to control which light(s) a Trådfri motion sensor should turn on/off is placing them in the same room in the IKEA app. Another “feature” of the IKEA app to notice is that it only works when your smart phone/table/watch is on the same WiFi network as the Trådfri/Dirigera gateway, while all the other app mentioned here work no matter where you are.
Fibaro app, which strictly speaking does not give you any options beyond what other apps do (except for firmware updating of Fibaro components). It does, however, have a somewhat different approach to how information gathered from the devices is presented to the user, and in some case it displays information not shown in any other apps. For some devices, this can be helpful. One small detail sufficient to justify using this app is that when defining more detailed programming conditions, one can use the on-screen keyboard to input limit values. This is far more precise than using the sliders in the Eve app, which often results in ending on the wrong value.
Koogeek Home app, which like the Fibaro app does not provide any additional functionality, but also this app presents information in alternative manners. This is particularly true for programmed automations, which have their own display pane, where each programmed rule is shown with easily accessible information about the state of the condition being monitored and when the rule was last activated. Especially when setting up new rules or troubleshooting, this comes in handy.
Heatmiser Neo app, which, having been made for smart thermostats, has additional functionality for such devices that the Home app does not provide. In the Home app, you can easily change the desired temperature, but in the Heatmiser app, you can also create more detailed temperature profiles throughout the day/night, even different profiles for working days and weekends.Apple Home
Finally, there are also third-party apps, i.e., apps by independent app developers that provide additional programming options for different types of components. Some have been created for a specific products, for example Philips Hue, others for a specific platform, like Apple Home or SmartThings. I have some experience with such apps, in some cases only from basic testing (and often realizing that the app didn’t solve my needs) and in other cases from more extensive use:
iConnectHue, which was probably the first third-party app I obtained, as it allowed some programming that I could not achieve in the Hue app. Later, this was added to the Hue app so I have effectively stopped using it, but the app is evolving and future versions might prove useful again.
I also purchased the rather expensive Home – Smart Home Automation app (which is a third party app, although named very similarly to Apple’s Home app), but I have not yet really discovered anything useful it can do which I couldn’t do with the Home app.
myHome, another app for Apple Home, which has some options beyond the Home app, like the use of iBeacon, grouping of rooms into zones, better integration with Apple Watch, etc. What I have found most useful is seeing which time-based triggers are coming up and partly logging (since I had some challenges with unexplained turning on/off of lights), but an issue with this is that the app must be open to do logging.
ControllerforHomeKit, yet another app for Apple Home, which comes both in a free and paid pro version. I have the pro versions, which also offers more advanced options for programming, displaying details, etc., and not in the least making backups of the Apple Home setup. This makes it much easier to replace device should the need arise.
SmartRules, this is a programming app for SmartThings and which offers more advanced options for programming, including definitions of more complex conditions before triggers should result in actions, such as requiring measured values to have stayed above/below a limit for some time. I tested this for programming the living room screen, but since it has no functionality for using wind measurements in programs, it didn’t work. For more advanced programming in SmartThings, it is still probably a good solution that is more powerful than native possibilities.
webCoRE, this is another programming platform for SmartThings. There is an app for smart phone as well as tablet, but this really gets powerful when used in a browser on a computer, with a bigger screen and keyboard. In contrast to most other platforms/apps, which typically use more visual approaches, webCoRE is based on scripting. This can probably be a barrier to getting started with programming, it is really both quite easy and powerful; one can program different logical combinations of conditions (AND/OR), very precise formulations of conditions, e.g., that the measured light level must have been exceeded for a certain period of time before taking action, etc.
This section of the page about control and automation has been added later, in 2022, since I throughout the years have accumulated some painful and important lessons learned that can be useful for others. Much has been written about this, both wireless networks in general and their role in the smart home, see for example this article about “networking”. It covers more topics and more details than what I address here, but my most important learning points are:
- Perhaps obvious, but still easy to forget; ensure good wireless network coverage in the whole house and all areas where devices using wireless network for communication are located. Many smart home devices are often installed in “odd” places around the house, for example leakage sensors in bathrooms or laundry rooms, motion sensors in rooms that are rarely used, security cameras outdoor, etc., and the quality and speed of the network in these places can vary significantly. Use a suitable app on a phone or other portable device and map the network quality around the house, and make improvements where there are shortcomings, either by installing more routers in a mesh network or other types of signal amplifiers or repositioning existing router(s). On my part, I have experienced issues with slow connections for a video doorbell, outdoor cameras, garage door opener, and other devices as a result of poor network quality and had to make several changes.
- Seriously consider whether there is a need for a separate, dedicated 2.4 GHZ frequency network; this is arguable the issue that has caused me the most headache! Early on when setting up our smart home, I installed an Orbi mesh network, which like most other such solutions offer both a 2.4 and 5 GHz network. With this setup, we had frequent issues with both instability, i.e., that devices became unavailable and had to be restarted, and speed, i.e., slow response or transfer of video. Some of this was probably caused by a less-than-optimal Orbi setup and that this network was quite heavily used, but even after adding a second mesh network, using Eero components, especially the problems with instability persisted. In some cases, the problem appeared in connecting a new device after purchase, despite Eero making it easy to only maintain a 2.4 GHz network for a short period of installation, but the worst problem consisted of devices just going offline and having to be restarted to come online again. This applied to different types of devices relying on wireless network for communication, like lighting products, heating devices, cameras, smart plugs, air humidifiers, base stations, etc. I finally bit the bullet and retrieved two old Apple Time Capsule routers out of attic storage and set them up again. These are not especially fast, but only use the 2.4 GHz band, and after having gradually migrated all devices that experienced problems to this network, this fixed practically all problems! It might sound a bit backward to set up a router based on older technology, especially if there is already a modern mesh wifi network, but if you have many devices that require 2.4 GHz (and there are many of those!), this can save you a lot of trouble.
- Investigate whether static IP addresses can fix some problems; while problems with devices are often caused by a combination of issues, one cause can be a dynamically assigned IP address. As most people will know, a router assigns IP addresses randomly within the range of addresses available. This happens seamlessly and is something you rarely have to think about, but in the smart home this can make a difference. It is, for example, a well-known advice to ensure that the base stations (Gateways) of IKEA Trådfri gets a fixed, static IP address. For some time, I did indeed have problems with the stability of my IKEA devices, and a static IP address has certainly helped. There are also some setups that depend on knowing the IP address of a device, e.g., some Homebridge plugins require entering the IP address in the configuration file for Homebridge. If the IP address can later change, the plugin will not work.
- Use base stations (bridges) where possible; I often hear from people and read in reviews of smart home devices that it is a bad thing when a product requires a base station, one would rather have a “stand-alone” product that doesn’t require an extra unit and the associated cost. Normally, this means using the wireless network for communication, thus further taxing an already hardworking network, as well as risking running into the above-mentioned issues of 2.4 GHz and dynamic IP address. Devices that instead connect to a base station offer many benefits; it means fewer devices connected to the wireless network (partly because such base stations often connect to the network using an ethernet cable and partly because one such base station normally will handle many different single devices), and the communication between the base station and the connected devices typically utilizes Zigbee or Z-Wave, which in many ways is better suited for this type of devices. In addition, a base station can be placed in a suitable location in the house, to offer optimal range for connected devices installed around the house. I would therefore strongly recommend actively choosing products that use a base station, especially if you expect to install more devices from the same vendor, and good examples of “ecosystems” are delivered by Philips Hue, IKEA Trådfri, Aqara, Meross, etc.